
Large Language Models (LLMs) are advanced AI tools that can understand and generate human-like text. For students, LLMs open up exciting new ways to learn and study. These models can explain difficult topics, answer questions, help with writing assignments, and even act as study partners. Whether you're preparing for exams, learning a new language, or working on a project, LLMs provide instant support and personalized help anytime you need it. By using LLMs wisely, students can improve their understanding, save time, and learn more independently and creatively.
Imagine a middle school student, Fatima, who is at home and cannot understand the concept of machine learning. She searches through YouTube but cannot get a video suitable to her level and context. She uses an LLM like ChatGPT or DeepSeek and asks it about machine learning and specifies her level and the context in which she requires the answer. The LLM provides a personalized answer in seconds without any long search. She visits her friend after some time, and during their discussion, her friend tells her that QR codes are unnecessary. She disagrees with her, and soon this turns into an argument. Fatima feels that her arguments are not enough, and she remembers her old friend, the LLM. She asks the LLM about why QR codes are necessary, and it gives strong and logical arguments to Fatima.
Now imagine another student, Ali, who has exams in two weeks and has tons of syllabus. He can't understand how to study all the subjects to complete the syllabus in time. He can just ask an LLM, and it will prepare a study schedule for him. It saves him from confusion and also his time, and now he can focus more on his studies. After a few days, let's say he is studying chemistry but is not confident about whether he is well prepared or not. He needs a practice quiz, and guess what? He has access to an LLM that generates a quiz. Ali performs well in it, and now he is confident in his preparation.
In this blog, we will develop Edumate, an educational assistant that allows users to use LLMs interactively. We will be using Mistral 7B Instruct from Hugging Face via an API. We will be deploying our application on Hugging Face as a space. You can find the deployment details and tutorial here. Our application will have the following features:
We will be developing our application using Streamlit. Use this terminal command to install Streamlit:
Now we will build our app.py, for which we will import dependencies first. Here is a little description of dependencies:
# Importing dependencies
import streamlit as st
import requests
Streamlit: A popular Python library for easily creating web-based apps.
requests: Used for making HTTP requests.
os: Used to handle files, folders, environment variables, and secrets.
Next, we will set up our API token for using LLM for generating responses. We will be using Mistral 7B Instruct from Hugging Face for this purpose. We store our API key in a secret in our space settings.
# Setting up Hugging Face API Token
HF_API_TOKEN = os.environ.get("API_KEY")
API_URL = "https://api-inference.huggingface.co/models/mistralai/Mistral-7B-Instruct-v0.3"
You can use the following steps to add a secret in Hugging Face Space:
We get its value from the environment variable (the secret we just created). API URL means the URL of our LLM. We store the key in the headers dictionary for authorization.
In this step, we will define a function to get a response from our LLM. It takes two inputs, a prompt for querying the model and a max tokens to limit the length of the response. Temperature controls how creative the model is. We set sampling to true so the model uses random words for variety. We send the request including the API URL, headers we created in the previous step, and the payload, which includes our prompt and parameters. Next, if the response code is 200 (OK), we convert the response to JSON format. We expect the response in a list format with a "generated_text" key. If the response is in the expected format, we remove the prompt from the response and just keep the answer otherwise, we return an unexpected response format. If we get a response code other than 200, we just return the response code and text.
def ask_mistral(prompt, max_tokens=500):
payload = {
"inputs": prompt,
"parameters": {
"max_new_tokens": max_tokens,
"temperature": 0.7,
"do_sample": True
}
}
response = requests.post(API_URL, headers=headers, json=payload)
if response.status_code == 200:
result = response.json()
if isinstance(result, list) and 'generated_text' in result[0]:
return result[0]['generated_text'].replace(prompt, '').strip()
else:
return "Unexpected response format."
else:
return f"Error: {response.status_code} - {response.text}"
Next, we create functions that are needed to use LLM for the required features. For the concept explaining feature, we take the concept and education level of the user as input parameters. We set middle school as the default education level. We define a good prompt and pass it to the ask_mistral function to generate a response. Similarly, we take topic and the number of questions as input for the quiz and flashcard generating functions. We set the default number of questions to 5 for quiz generation and 1 for flashcard generation. For the study scheduling function, we take the subjects’ names from the user list and the total hours he has in a day. We pass the list of subjects and total hours to get a response from LLM. The real-world usage function just takes the concept and explains its usage in the real world.
# Defining feature Functions
def explain_concept(concept, level="middle school"):
prompt = f"Explain the concept of {concept} to a {level} student with a simple example."
return ask_mistral(prompt)
def generate_quiz(topic, num_questions=5):
prompt = f"Create a {num_questions}-question multiple-choice quiz on the topic '{topic}'. Include options and answers."
return ask_ mistral(prompt)
def generate_flashcards(topic, num_questions=1):
prompt = f"Generate {num_questions} flashcards for the topic '{topic}' in the format: Question - Answer."
return ask_ mistral(prompt)
def create_study_schedule(subjects, hours_per_day=2):
subject_list = ", ".join(subjects)
prompt = f"Create a weekly study schedule for the subjects: {subject_list}. Allocate about {hours_per_day} hours per day."
return ask_ mistral (prompt)
def explain_real_world_use(topic):
prompt = f"Explain how the topic '{topic}' is used in real-world situations."
return ask_mistral(prompt)
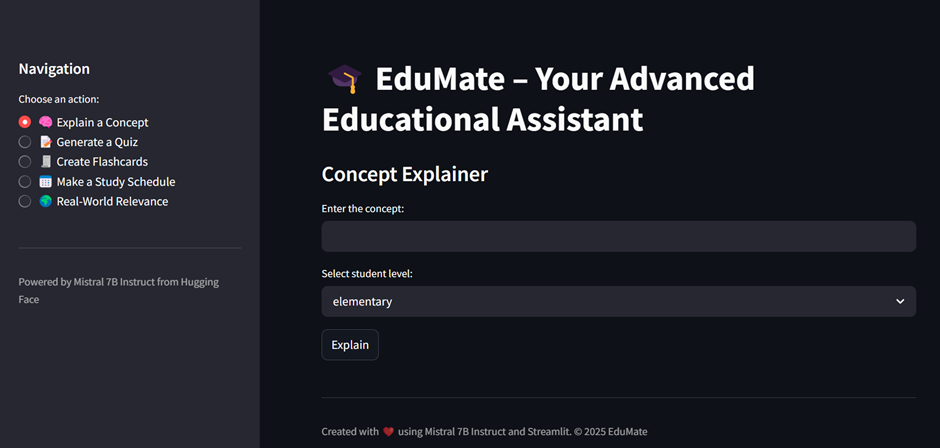
In the next step, we set up the Streamlit user interface. First of all, we set the page configuration by setting the page title and page icon. We add emojis to enhance user experience. We use a wide layout for the page. We make a sidebar used for Navigation, having options for users to use LLM for its intended purpose. We add an end caption in the sidebar to provide users about the API used in the application. We also add a horizontal line to separate the sections.
# Setting up Streamlit UI
st.set_page_config(page_title="EduMate – AI Educational Assistant", page_icon="🎓", layout="wide")
st.title("🎓 EduMate – Your Advanced Educational Assistant")
st. sidebar.header("Navigation")
option = st.sidebar.radio("Choose an action:", [
"🧠 Explain a Concept",
"📝 Generate a Quiz",
"🧾 Create Flashcards",
"📅 Make a Study Schedule",
"🌍 Real-World Relevance"
])
st.sidebar.markdown("---")
st.sidebar.caption("Powered by Mistral 7B Instruct API via Hugging Face")
In this step, we define the steps taken by the application when a user selects an option. If the user selects the concept explanation button, the interface shows a sub-header and asks the user to input the concept he want to understand and his education level. When the user presses the “Explain” button, the concept explanation function is called, and the response by the LLM is written onto the interface. If the quiz generation option is selected, the interface shows a sub-header and asks the user to input the topic and the number of questions they want. When the “Generate Quiz” button is pressed, the quiz generation function is called, and the user gets the generated quiz. Similar is the case for the flashcard generation option.
# Defining actions for different options
if option == "🧠 Explain a Concept":
st.subheader("Concept Explainer")
concept = st.text_input("Enter the concept:")
level = st.selectbox("Select student level:", ["elementary", "middle school", "high school", "college"])
if st.button("Explain") and concept:
st.info("Generating explanation...")
st.write(explain_concept(concept, level))
elif option == "📝 Generate a Quiz":
st.subheader("Quiz Generator")
topic = st.text_input("Enter the topic:")
num = st.slider("Number of questions:", 1, 10, 5)
if st.button("Generate Quiz") and topic:
st.info("Creating quiz...")
elif option == "🧾 Create Flashcards":
st.subheader("Flashcard Generator")
topic = st.text_input("Enter the topic:", key="flashcard_topic")
num = st.slider("Number of questions:", 1, 5, 1)
if st.button("Generate Flashcards") and topic:
st.info("Generating flashcards...")
For the study scheduling option, the interface shows a sub-header and asks the user to input subjects as a comma-separated list and the number of hours he has to study in a day. The input is then converted to a Python List. The information is then passed to the study scheduling function using the “Create Schedule” button, and the user gets the schedule. When the real-world relevance option is selected, the topic name is taken as input. When the “Explain Relevance” button is pressed, the LLM gives the real-world usage of the topic.
elif option == "📅 Make a Study Schedule":
st.subheader("Study Planner")
subjects = st.text_input("Enter subjects (comma-separated):")
hours = st.slider("Study hours per day:", 1, 10, 2)
if st.button("Create Schedule") and subjects:
subject_list = [s.strip() for s in subjects.split(',')]
st.info("Building your study plan...")
st.write(create_study_schedule(subject_list, hours))
elif option == "🌍 Real-World Relevance":
st.subheader("Why It Matters")
topic = st.text_input("Enter the topic:", key="real_world_topic")
if st.button("Explain Relevance") and topic:
st.info("Connecting to the real world...")
Next, we add a caption at the end providing credits to the services used. We use a horizontal line to separate the sections.
st.markdown("---")
In conclusion, Edumate helps students learn better by giving quick and personalized help using a smart AI model. It saves time, clears confusion, and makes studying easier and more fun. With Edumate, learning becomes simpler for everyone.
Powered by Froala Editor